Stock control / Inventory management

ShopFactory comes with an inventory management system. You can update stock levels manually or automatically.

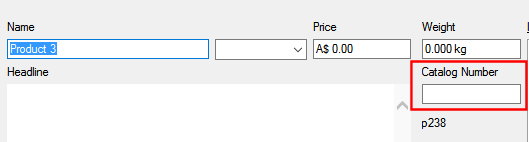
Only products which have a catalog number (SKU) are supported. All products must have unique SKUs

Below you will find information on how to enable stock control and how to keep it up to date.

You can also combine product catalog numbers (SKUs) of a product with it's options (see Combine Catalog / SKU numbers) to more easily enter stock levels for different sizes of the same product.

If you use manual stock control you must update the stock levels of products manually after each sale in ShopFactory.

If you use automatic stock control you must have ShopFactory Cloud (Total Care). Then stock levels in your store will be automatically updated after sales.

To enable inventory management, enable Stock control in the My Store drop down menu of ShopFactory Central.

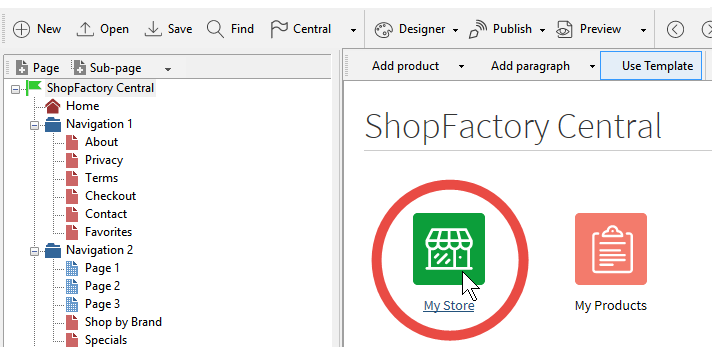
The inventory management setup wizard opens.

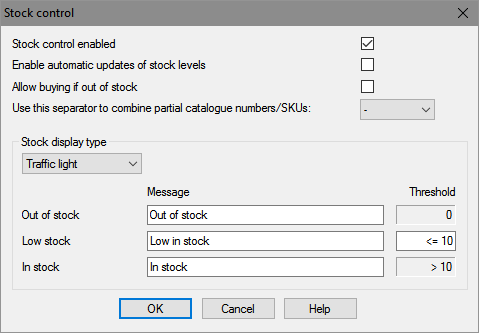
You can then configure and activate the inventory control.

Inventory Control Settings:

Stock control enabled

Tick, if you want to enable stock control.

See Stock control / Inventory settings.

Import stock levels

Import Wizard:

If you have an external list of stock levels, you can easily import it into ShopFactory to update your stock levels with Import Wizard.

You only have to know the SKU (Catalog number) and the stock level available to update the stock levels of the appropriate product in ShopFactory.

See Stock control / Inventory settings.

Use this separator to combine partial catalog numbers/SKUs

A number of separators you can use between catalog numbers, when using the Combine function to combine catalog numbers of a product and its attributes (choices).

See Stock control / Inventory settingsProduct Options.

Allow buying if out of stock

If you tick this options customers can order products, even if they are out of stock. This can be useful if your out of stock message contains a delivery time, such as “Delivered within 14 days”.

See Stock control / Inventory settings.

Stock Display Type:

This option defines how the stock levels are displayed to your customers.

  • None: Customers do not see the stock levels.
  • Exact: Customers will see the exact stock level displayed with each product
  • Traffic Light: This is the recommended stock display method. It will display one of three stock level messages to the customers, depending on the stock level you have. You can set these messages for all products. You can override the out of stock message for each product to replace it with one more appropriate for a specific product, such as 'Delivery time 14 days".

See Stock control / Inventory settings.

Message

These messages can be set, depending on the display type you have selected. Traffic Light gives access to all three settings.

  • Out of Stock: This message is displayed if a product is out of stock. You can override the out of stock message on the product level for each different product in the product level wizard.
  • Low stock: This message is displayed if a product is low on stock, depending on the Threshold defined by you.
  • In stock:  This message is displayed if a product’s stock levels are higher than defined in the Threshold.
  • Threshold: Defines the stock levels for the different traffic light settings.

See Stock control / Inventory settings.

Combine Catalog numbers / SKUs

This function allows you to combine the partial catalog number (SKU) of a product with a partial catalog number of an attribute such as color or size to generate a unique catalog number for the item. This is done with the Options and Choice Wizard.

You can then define the stock level for the combined catalog number, which represents the actual item, such as a red T-shirt or a shoe of a specific size. To create a combined SKU place a * into the 'Combine' column by clicking in the row of the option.

A simple example:

The partial shoe catalog number is PumaX .

The partial catalog numbers of the available sizes are s8, s9, s10.

In combination your unique catalog numbers will be PumaX-s8, PumaX-s9 and PumaX-s10.

You can now enter stock levels for all three shoe sizes.

See also Product Options / Attributes, Stock control / Inventory settings.

How to enter stock levels

If you have an existing database you can simply import the stock levels with ShopFactory ImportWizard. Just make sure that the catalog numbers in your database match those in ShopFactory.

Or you can maintain stock levels manually. 

Manually maintaining stock levels

You can also easily adjust your stock levels manually as required.

For one product: Select the product and click on the Stock Level Link in the product wizard.

For all products: Click on Properties and select 'Stock levels'

For all products on a page: Select the page in the tree, RIGHT click on it, then click on  Stock levels...


 In all these cases the stock level wizard will open, allowing you to view and manage your stock levels. All products with a unique catalog numbers will be displayed so you can check and adjust their stock levels and other values.


   This represents a normal product
   Product bundle - a separate product sold only in a bundle with other products
   A product created with the 'Combine Catalog numbers / SKUs' function, i.e. defined by an attribute such as color
   In stock (traffic light display)
   Low stock  (traffic light display)
   Out of stock  (traffic light display)
   In stock (exact display)
    Out of stock (exact display)
Stock  The available stock quantity
Min. order quantity  Customers must buy at LEAST this quantity
Max. order quantity  Customers can not buy MORE than this quantity
Out of stock message  The message shown, when a product is out of stock. You can change it for each product, for example to provide a delivery time instead.
Settings This button gives you access to the stock level settings dialog.
Synchronize  This button appears, if you use 'Automatic update of stock levels'. When you click it ShopFactory downloads the stock levels from you online shop and reduces all stock levels with the items sold online. You must do this before you click on the button 'Publish Stock levels' so you don't overwrite your up-to-date stock levels on your server with the out-of date settings in your shop.
Publish Stock levels Publishes your stock levels to your server for real-time stock control. Every time an item is sold, the online stock is reduced. Make sure to 'Synchronize' stock levels before publishing to keep your online stock levels up to date.


To enter or adjust a value, click once on the field to select it, then click on it again to open it up or use the TAB key on your keyboard. Once you have selected a field, you can use the UP and DOWN arrows on your keyboard to jump from row to Row, or the TAB key to jump from field to field.

If a field contains no value (content deleted) then it will not be taken into account for stock control. A stock level of '0' means out of stock. If the stock level field is empty, the product can be purchased in unlimited quantities.


A quick way to adjust stock levels manually

If you use the traffic light display, a quick way to adjust stock levels simply by clicking on the stock level icon such asto change it.

This will adjust the message which will be displayed in the shop to the customer and adjust the stock level to the Threshold level you have defined in the settings dialog.

Red text in stock control

Data rows highlighted in red text in the stock level list indicate a problem.

It means we have found products which have the same catalog number (SKU) but different product titles. As a catalog number or SKU must be unique for each product, this conflict is highlighted in red.